Create Expandable Regions in MOSS Publishing Pages

When you have a large amount of text on any given MOSS Publishing page it can obscure information that the reader wants. You're always free to split that content across several publishing pages of course, but that might not agree with your sites structure or how users want to access that information.
Today I present a technique to help solve the problem that doesn't come out of the box [OOTB] with MOSS 2007. With a little bit of javascript we can introduce text regions that can be expanded or contracted by the reader.
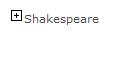
There's no active content in this posting, so a picture will have to illustrate what we're after. How would you like to be able to contract your publishing page text so it's small like this;
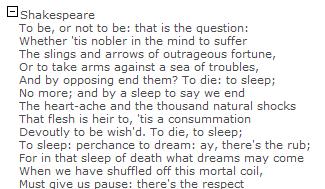
Then click the Plus icon so that the text is displayed;
This is achieved with a little bit of javascript, and a couple of icons, and is pretty simple.
You basically need a <div> or some such where your content will go, and a plus and minus graphic in a couple of <img> tags. An onclick of the images calls a method called showhide() and passes their local div id. This toggles the visibility of the text and the appropriate plus or minus graphic and the job is done. My showhide() function is shown below. Notice how the div and the images all have a variant of the same id so that they can be located as a group by the script;
function showhide(divid)
{
thediv = document.getElementById('div'+id);
theplusimage = document.getElementById(id);
theminusimage = document.getElementById('Minus'+id);if(thediv.style.display== 'none' )
{
thediv.style.display='block';theplusimage.style.display=
'none';theminusimage.style.display='inline';
} else { theplusimage.style.display='inline';theminusimage.style.display= } }
This javascript is going to be a problem though, as you can't put javascript into your content pages or indeed any reference to it (the editor will take it out on save). You can put script into your Page Layouts, but that would hard code these expandable regions into set places on the page which is undesirable.
What we need is a way to have ordinary old HTML content (our div, images, and some text) that somehow gets subscribed to the appropriate javascript events dynamically.
I settled on a technique called Event Bubbling to do this for me. In plain English, what I have is a script that runs whenever anything in the document is clicked, but only performs an action when it's something I'm interested in - in this case one of my plus/minus icons. To cut a long story short it avoids memory leaks in some browsers, adheres to the philosophy of 'Unobtrusive Javascript' and lets me KIS. You run this script after the page loads, and it looks like this;
document.body.onclick = function(e)
{ // get event target (IE and W3C)
var target = e?e.target:window.event?window.event.srcElement:null;
if(!target) return;
// if target is img element, check further conditions try { showhide(target.id); } else if (target.title == 'Minus') { } } {} } }
Using this technique means that the content doesn't contain any of the javascript, so Sharepoint is happy. (You can deploy the script in page layouts, or reference in Masterpage etc etc depending on teh scope you want for this functionality).
The scripting shown so far would work without any further work. Easy wasn't it? But something doesn't feel right! Are your content authors really going to want to put <div> and <img> tags with the correct format and attributes by hand? Sounds unlikely!
The creation of those <div> areas needs some automation, and be easy to trigger when editing a page. An obvious thing to do is to expand the HTML Editing Toolbar with an extra button to perform this action for you. There is plenty of guidance about how to do this. The most straightforward being by The Mossman here; http://www.sharepointblogs.com/mossman/archive/2007/05/07/how-to-add-a-button-to-the-html-editor-control-in-sharepoint.aspx
Starting out with his example RTE2ToolbarExtension.xml and RTE2ToolbarExtraButtonTest.js files, I had to make a few modifications to RTE2ToolbarExtraButtonTest.js as follows;
The RTE2_RegisterToolbarButton was changed to have appropriate icon and alt text. Nice that there is a Plus icon OOTB like that!
RTE2_RegisterToolbarButton("myCustomButton", RTE_GetServerRelativeImageUrl("PLUS.GIF"), "", "Add Expandable Section", TestButtonOnClick, TestButtonOnResetState);
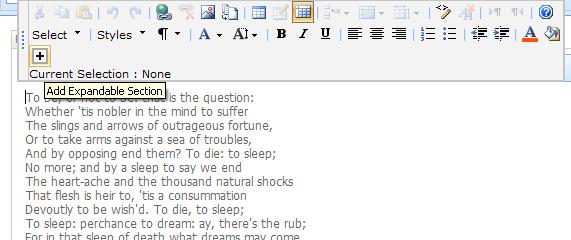
Further, each of my sections need a unique id to match up which Plus icon is clicked to which <div> is expanded etc. It's probably overkill to use a GUID as the id so you could slim this down. Anyway I added these utility functions; } } Finally, I need to insert the HTML (with unique GUID) that will be acted upon by my javascript. This is done inside TestButtonOnClick(); //get the document that is being edited //if nothing is being edited quit //get the selected text //get a unique id for this section //put it all together //Put it into the document rngSelection.pasteHTML(htmlString); //restore the button state (make it clickable again) RTE_RestoreSelection(strBaseElementID); } All this work gives me an Editor Button that looks like this;
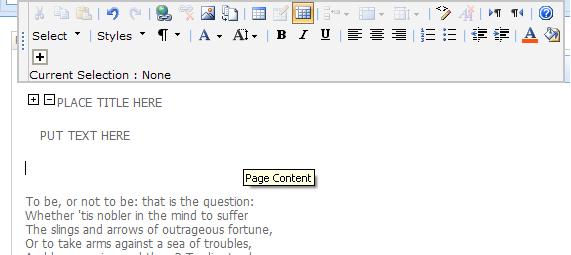
Which when clicked gives me an Expandable region that in edit mode looks like this;
If you need the plus and minus icons to develop this, just right click and download these examples; ![]()
![]()
Conclusion
The heart of this article shows a simple way to leverage javascript in specific places within your MOSS content. This is achieved without the javascript going into your content. Although we produce expandable sections in this example, it's clear you could leverage this technique to do all sorts of things.
In a production environment there are a few issues with this solution as outlined. The MOSS HTML Editor has a habit of randomly re-writing your HTML. In some occasions this has stripped the id attribute from my <div> elements, hence stopping the expansion function from working properly. We can only hope such crazy behaviour is Service Packed out of MOSS at some future juncture.
Final Notes
The article above misses out a few steps for the sake of clarity. If you want to implement this solution yourself you need to read this!
The code that registers the event bubbling needs to be run when the page loads. In Sharepoint you use _spBodyOnLoadFunctionNames.push("start"); in your script section to achieve this (start being my function name).
The full script to deploy to your page layouts (or other location depending on scope) is;
<script type="text/javascript">_spBodyOnLoadFunctionNames.push("start");
function start(){
var minusImgs = getMultiTagFromIdentifierAndTitle("img", "", "Minus");
for(var i=0; i<minusImgs.length; i++){ try{ minusImgs[i].style.display = 'none';}catch (err){}
}
document.body.onclick = function(e){ // get event target (IE and W3C) var target = e?e.target:window.event?window.event.srcElement:null;if(!target) return;// if target is img element, do your thing if(/img/i.test(target.nodeName)) { try { if (target.title == 'Plus') { showhide(target.id); } else if (target.title == 'Minus') { var id = target.id; showhide(id.replace(/Minus/,"")); }
} catch (err) {} }}}
function showhide(id){ thediv = document.getElementById('div'+id); theplusimage = document.getElementById(id); theminusimage = document.getElementById('Minus'+id); if(thediv.style.display== 'none' ) { thediv.style.display='block'; theplusimage.style.display='none'; theminusimage.style.display='inline'; } else { thediv.style.display='none'; theplusimage.style.display='inline'; theminusimage.style.display='none'; }}
function getMultiTagFromIdentifierAndTitle(tagName, identifier, title) {
var len = identifier.length; var allTags = document.getElementsByTagName(tagName); var selectTags = new Array(0);
for (var i=0; i < allTags.length; i++) {
var tempString = allTags[i].id;
if (allTags[i].title == title && (identifier == "" || tempString.indexOf(identifier) ==
tempString.length - len)) { selectTags.length++; selectTags.push(allTags[i]);
}
} if (selectTags.length > 0) { return selectTags; }
return null;
}
function getTagFromIdentifierAndTitle(tagName, identifier, title) {
var len = identifier.length; var tags = document.getElementsByTagName(tagName);
for (var i=0; i < tags.length; i++) {
var tempString = tags[i].id;
if (tags[i].title == title && (identifier == "" || tempString.indexOf(identifier) ==
tempString.length - len)) {
return tags[i];
}
}
return null;
}
</script>
Mossmans article (link above) covers most of what you need to get the Editor button working, and my customisations as mentioned in the article should be enough to get it functioning as I describe. Any problems, email me and I will reply or edit the article with clarifications as appropriate.
If you need any further guidance on this, or any other aspects of MOSS Web Content Management I recommend Andrew Connells new book on the subject. Check out the link below;